V032202
Tech Notes & Misc Info
These are findings from my tinkering.
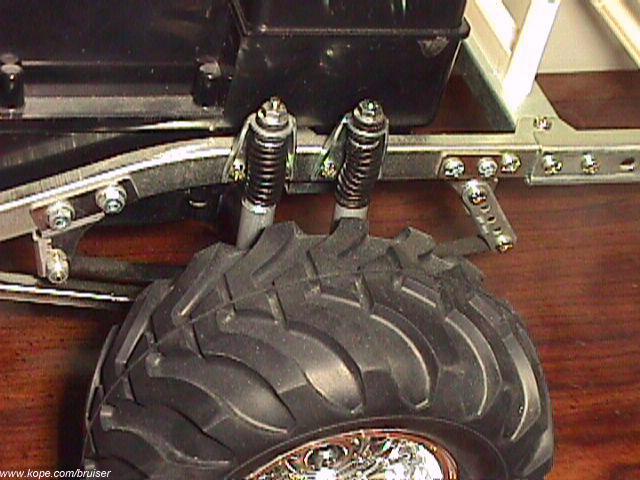
Dual Shock Mounts
Picture
You can mount up to 4 shocks on the rear end of your Bruiser/Mountaineer. You'd need two additional Shock Towers and two additional shocks. I use Tamiya Heavy (purple) Silicone Damper Oil as a rule for all Bruiser shocks. Rear damping is now adequate, plus it looks really cool.
You can't easily mount dual shocks in the front end. The steering crank will interfere with the second shock. For better damping, see below.
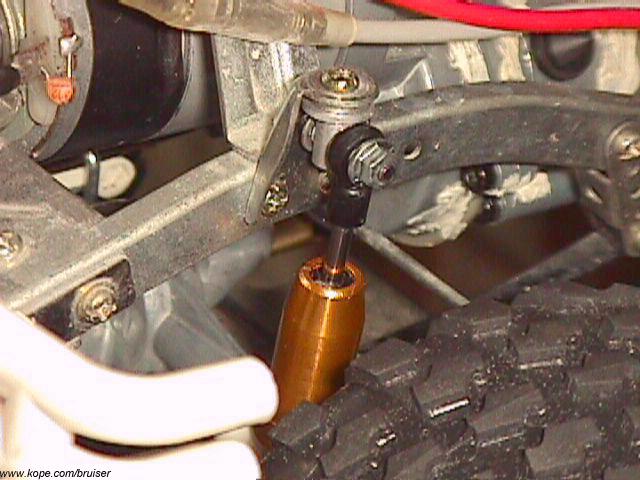
Aftermarket Oil Shocks
Front Rear
I've adapted one of my Bruisers to use Duratrax 3" Oil Shocks with nothing but Tamiya components. You'd need Shock Mounts from Tamiya x7821 Screw Bag E (for kit 38/40, two bags required, for 4 mounts). Turn down the larger diameter mount on a lathe or electric drill (with a metal file) so it fits thru the Bruiser shock stay and bolt the shocks on. Rear shocks are mounted angling forward, front shocks hang straight down. Damping action is vastly improved, at the expense of slightly (1/16-1/8"?) decreased travel up front. I used Tamiya Heavy (purple) Silicone Damper Oil.
A similar solution can be devised using other materials, if you are handy with tools.
Transmission Rebuild
You have to ask yourself, do I really want to do this? You CAN open it up and retrofit some bronze bearings with 5x1150 and 9x850F ball bearings, but there might be some problems. For one, the flanged bearings are typically adjacent to some non-spinning surface, and without some kind of spacer to keep the flange from rubbing that surface, you're not totally reducing friction. I've looked into getting those spacers made (5mm ID, 6-6.5mm OD) but they'll cost $2 APIECE. I've found that Calandra's 5mm axle shims (search Tower Hobbies) will work, and the price is reasonable. You may also find similar products from Traxxas.
Transmission Service Manual, in pdf format! (2.9MB)
Transmission Exploded Diagram (pdf, 655KB)
Transmission Lube
Speaking of transmission. I've had good results lubricating with Slick50. I've also tried BreakFree CLP (which contains Teflon) with decent results.
Ball Bearings
Although the Bruiser/Mountaineer comes with ball bearings in the Hubs, you really should retrofit your truck with ball bearings in the drivetrain, especially the Axles. Bevel Shafts can wear out so at the minimum support them with BBs. Front axle: 2x1150 in the Knuckle Arms, 2x1150 for the Bevel Shaft, 3x1150 on the Front Axle Shaft (optional, since you can't really replace them without minor surgery - you need to press out the drive pins at the end). Rear axle: 2x850, 1x1150, 2x1150 for the Bevel Shaft. Transmission: See above.
Note that bearing sizes are given in Tamiya notation, e.g. 1150 = 11x5mm, etc.
Front Hubs
Do NOT overtighten the 3mm locknut, or binding in the front drivetrain may occur. You may also break the one-way bearings that way. When mounting the front hubs, always make sure the front axle and driveshaft can spin freely.
You can mount a set of rear hubs up front. You will lose front one-way action, but it will now be possible to get 4WD in reverse (ever been stuck and can't back out?). Make sure you run the truck in low traction surfaces (sand, loose dirt, etc) to avoid damage to your axle shafts/bevels/transmission.
Wheels
I prefer the Bruiser 3pc gripper wheels to the Mountaineer 1pc wheels. They may weigh a bit more, but you can mount soft aftermarket tires without gluing. However, some people mount the stock tires on 1pc wheels without glue for a slipper clutch-type effect.
Radios/Shifting the transmission
Most people use a 4 channel stick radio, so that's what I'll describe here. The way it works is you get/make a shifter gate (pattern is in the bruiser manual), which you put on the left stick of your Tx. It resembles the shifter gate on a Ferrari. The shifting is done by the sideways movement of the left stick, so to keep it in gear, you just 'shift' into the appropriate gate. Full left is Low, middle is 2nd gear, and full right is High. I assign the right stick for fwd/rev (up down), and left right. There are 3 channel pistol radios like a 3PDF, but I have no idea how the 3rd channel works, as you have to be precisely in the middle (servo neutral) for 2nd gear. In Japan, you can still get a Sanwa, with the shifter gate pre-installed. People still use them for Tamiya's tractor trailers, which is also a 3-speed.
Current 3 or 4 channel Surface (27 or 75Mhz - stick with 75Mhz) stick radios on the market: Airtronics VG4R (MSRP $225.95 - 245.95), Hitec/RCD Ranger 3 FM (MSRP $125.99) Note that the although the Ranger is a stick radio, channel 3 is controlled via a knob so I'm not sure how you might precisely shift with it. Hitec may still offer their Focus 4 channe, which you can see in AHC's catalog, but I didn't find it on the website. In Japan, there's a Sanwa with a built-in shifter gate, made specifically for Tamiya models, unfortunately they're not sold here.
You may have to search around for a stocking dealer (multi channel surface radios aren't that popular), so chances are they will have to be special ordered. Check with Tower Hobbies or AHC.
Of course, there are 3 channel Pistol radios meant for cars, but I have no info on operation of the 3rd channel.
Your other alternative is to search for a used radio, such as Futaba's Attack 4 or Conquest 4. They are very well built radios, but are no longer made. I use those personally.
It isn't recommended that you use an aircraft radio on surface models. You might cause someone to crash their r/c plane!
Cheapskate Fixups
Rubber Bushings can be replaced with sections cut from silicone fuel tubing of appropriate diameter.
Metal Bushings (short brass tubes) can be substituted with appropriate diameter brass or aluminum tubing cut to size (e.g. K&S, available at most hobby shops and art/craft supply stores).
Worn Shock Shafts can be refinished in some cases with very fine (600-2400 grit) sandpaper followed by metal polishing compound.
The styrene bodies are fairly durable. Road rash can be fixed using modeling putty, the same way real automotive bodywork is done. Paint may be chemically stripped in certain cases using ordinary brake fluid, Easy Off oven cleaner, or specialized plastic-model paint strippers (such as those made by PollyScale). It may take a while (from hours to days). Lacquer paint, such as automotive touch-up, is difficult to remove chemically.
Rather than spending $$$ on Tamiya Ceramic Grease or Moly Grease, the stuff I find in my garage for motorcycle use (Noleen SF-3 synthetic grease) work extremely well inside axle assemblies (and gearboxes for other cars).
Not really a fix, but supposedly you can DYE the (flexible) plastic bumpers (front/rear) using Rit dye instead of painting them.
Can't find the various trim pieces to the body? Tint the windshield and do without the interior! No rear glass? Make one from a flat piece of clear styrene.
Wheels: if the chrome is pitting, you can remove the chrome entirely and have white wheels by soaking in Liquid Plumr or Drano for 15 minutes.
What doesn't Work
Front axle hubs on the rear axle. I tried one, to see if I can get acceptable differential effect. Too much wheelspin.
Rear axle hubs on front axle, on high traction surfaces. May result in damage to drivetrain.
High speed turns on asphalt. Unless you enjoy flipping your truck.
Misc Info
The following are according to my ruler, which will help you in choosing a custom body:
Body dimensions:
Length: 18.5"
Width: 7.5"
Body mount distance: 14.75"
Chassis dimensions
(approx):
Wheelbase: 11.5"
Overall length: 20.75
Outer Track: 10" F, 11" R
Compared to the real counterpart, our model is approx 1:9.
Main Page This page is part of a frameset. If you found it via a search engine, please visit the whole site for additional details!
V032202